Perfect Marbled Bread

Watch the Full Step-by-Step
- 9×5-inch (23×13 cm) loaf pan
INGREDIENTS
Starter:
- ½ cup/120 milliliters milk
- 1 teaspoon/5 grams sugar
- 1 teaspoon/5 grams active dry yeast
Main dough:
- 1 tablespoon/15 grams beaten egg, use half a standard egg
- 2 tablespoons/20 grams sugar
- 1 cup plus 3 tablespoons/170 grams all-purpose flour
- ½ teaspoon/3 grams salt
- 2 tablespoons/30 grams cold butter, cut into cubes
Cocoa dough:
- 1 tablespoon/15 grams beaten egg, use half a standard egg
- 2 tablespoons/20 grams sugar
- 1 cup/140 grams all-purpose flour
- 2 tablespoons/30 grams unsweetened cocoa powder
- ½ teaspoon/3 grams salt
- 2 tablespoons/30 grams cold butter, cut into cubes
INSTRUCTIONS
- In a small bowl, stir together the milk, sugar, and yeast. Let sit for 10 minutes until the yeast is dissolved and bubbly.
- Transfer the mixture to the bowl of a stand mixer fitted with a dough hook. Add the egg, sugar, flour, and salt. Knead on low speed until a soft dough begins to form. Add the butter, one cube at a time, kneading until each piece is fully incorporated before adding the next. Increase the mixer speed to medium and knead for 10 minutes, until the dough is smooth, elastic, and uniform. Transfer to a lightly oiled bowl, grease the top of the dough, cover with plastic wrap, and let rise for 40 minutes at room temperature. Repeat the same process with the cocoa dough.
- Once both doughs have risen, gently press them down to deflate. Transfer to a lightly floured work surface. Divide each dough into 6 equal pieces, shape into balls, and cover with plastic wrap. Let rest for 10 minutes.
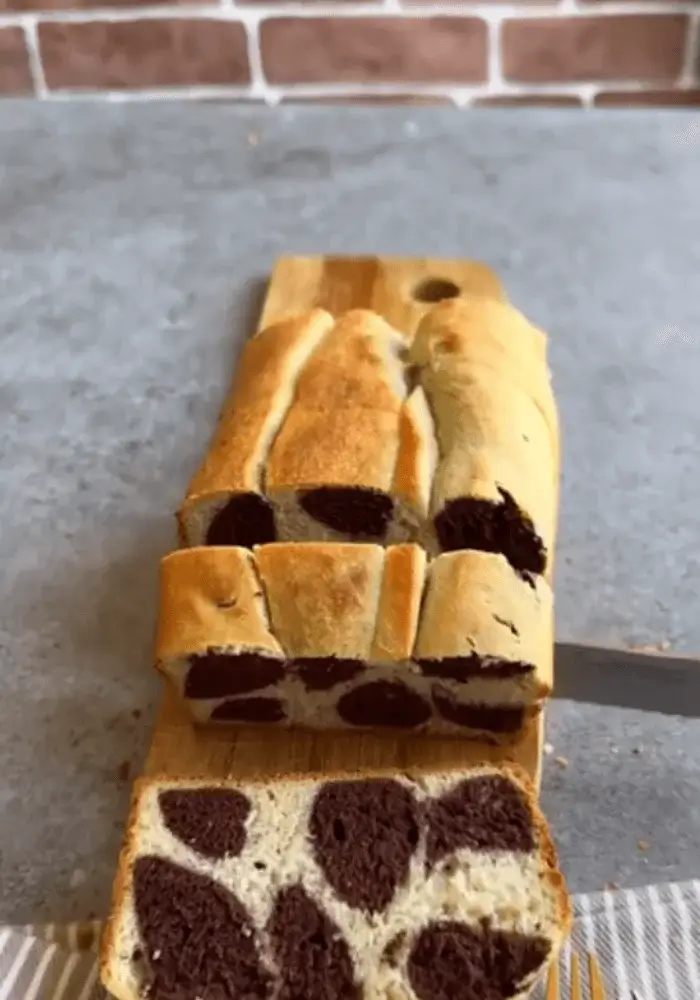
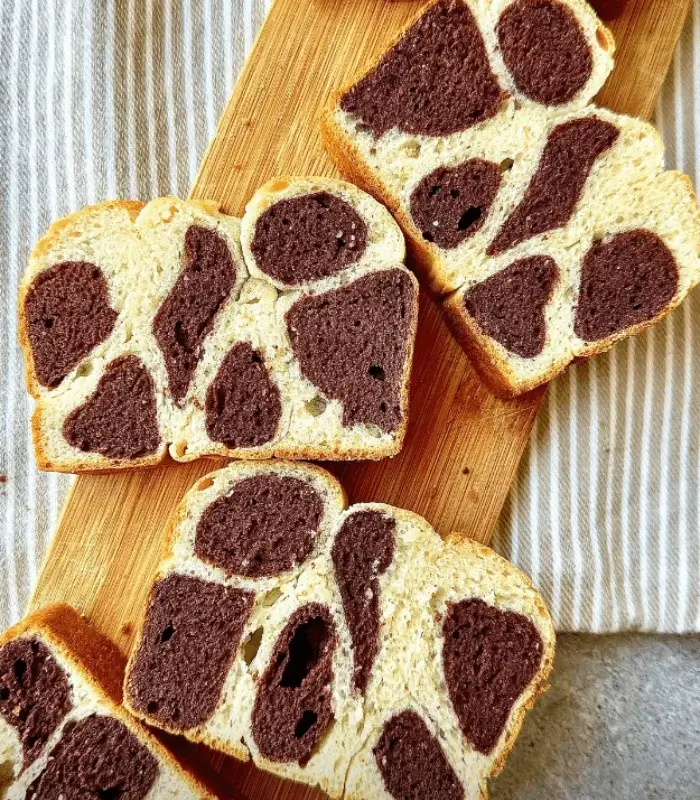
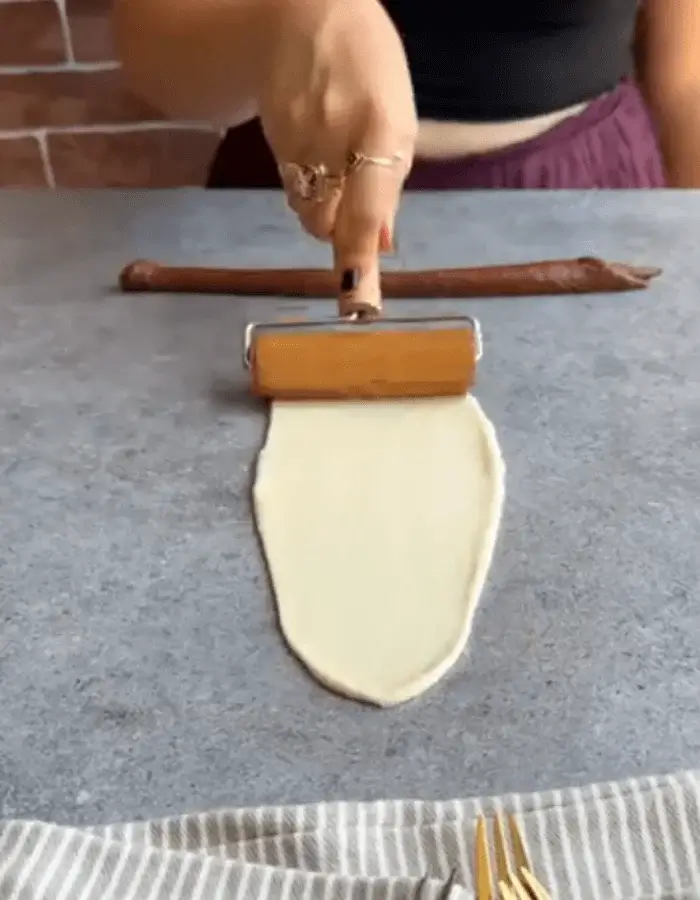
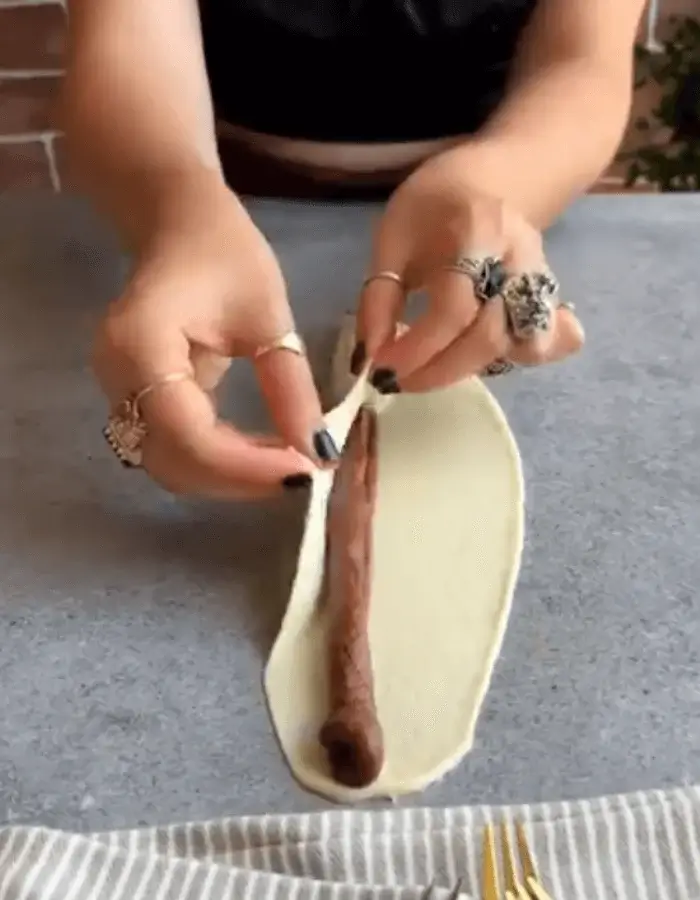
- Roll each piece into a thin rectangle. Roll each cocoa dough portion into a long cylinder. Place each cylinder on a white rectangle and roll up to form a log, completely encasing the cocoa dough.
- Grease a loaf pan well. Arrange the logs inside and cover loosely with plastic wrap. Let rise for 30 minutes.
- Preheat the oven to 340°F (170°C).
- Bake the loaf for 25 to 30 minutes, until puffed and golden brown on top. Let cool in the pan for 10 minutes, then remove and allow to cool completely before slicing and serving.
FAQ
What is the best way to shape marbled bread?
To achieve a clear marbled pattern in marbled bread, it’s essential to handle both doughs with care during shaping. After preparing and proofing both the plain and cocoa doughs, roll each portion into a rectangle. Roll the cocoa dough tightly into a log, then wrap it completely in a layer of the plain dough, sealing the seam well. Align the logs side by side in the loaf pan so that the contrast between the doughs is visible throughout the loaf. Avoid over-mixing or kneading the doughs together at this stage, as that can blur the definition of the marbling.
Can I make marbled bread with other flavor combinations?
The bread can be made with many flavor combinations beyond cocoa and vanilla. Popular variations include matcha with plain dough, espresso with vanilla, or even turmeric with a lightly sweetened plain dough. The key is to ensure that both doughs have similar hydration and consistency so they rise and bake at the same rate. Flavors should be strong enough to be distinguishable but not overpowering. Avoid using fillings or additions that could cause uneven moisture levels, as this can affect the texture of the marbled bread and compromise the swirl pattern during baking.
Why did my bread turn out dense?
The bread can turn out dense for several reasons. One common cause is under-kneading, which prevents the gluten from developing properly, resulting in poor structure and low rise. Another issue may be incorrect proofing—either not allowing enough time for the dough to rise or letting it overproof, both of which affect oven spring. Cold ingredients, especially butter or milk, can also inhibit yeast activity. Ensure the dough is kneaded until smooth and elastic, rises in a warm, draft-free environment, and is baked immediately after the second rise. Accurate flour measurements and fresh yeast are also critical for fluffy marbled bread.
How long does the bread stay fresh at room temperature?
This bread typically stays fresh at room temperature for 2 to 3 days, provided it is stored properly. To prevent it from drying out, wrap the cooled loaf tightly in plastic wrap or store it in an airtight container. Avoid refrigerating the bread, as that can cause it to stale faster due to moisture loss. If you need to keep it for longer than a few days, freezing is a better option. Always slice only what you need and keep the remaining loaf wrapped to reduce exposure to air. Storing it with a slice of apple or a damp paper towel can help maintain softness.
Can I freeze this bread and still keep the texture intact?
Yes, marbled bread freezes well and retains its texture if frozen and thawed properly. Allow the bread to cool completely after baking, then wrap the whole loaf or individual slices tightly in plastic wrap and place them in a freezer-safe bag. This double layer helps prevent freezer burn and moisture loss. To thaw, leave it at room temperature in its wrapping for a few hours or overnight. For best results, refresh slices in a toaster or the oven at 300°F (150°C) for 5 to 10 minutes. Avoid microwaving, as it can make marbled bread gummy or unevenly heated.
Can I make marbled bread without a stand mixer?
marbled bread can be made entirely by hand if you don’t have a stand mixer. Begin by mixing the ingredients in a large bowl using a wooden spoon or silicone spatula until a shaggy dough forms. Then knead on a clean work surface for 10 to 15 minutes, or until the dough becomes smooth, elastic, and cohesive. Add the butter gradually while kneading, incorporating it fully before adding more. Repeat the process for the cocoa dough. Hand-kneading requires more effort and time, but the results are just as effective. Ensure you’re kneading long enough to properly develop the gluten.
Prevent the cocoa dough from overpowering the vanilla
To keep a balanced flavor in marbled bread, make sure the cocoa dough isn’t too bitter or dominant. Use unsweetened cocoa powder, but add a small amount of sugar—about 1 to 2 teaspoons per 30 grams of cocoa—to temper the bitterness. Also, ensure both doughs have similar sweetness levels, salt content, and fat for even flavor distribution. Don’t use too much cocoa dough compared to the vanilla; a 1:1 ratio by weight or a slightly smaller amount of cocoa dough works well. During shaping, avoid blending the doughs too much so the vanilla flavor remains distinct in the final loaf.